| Episode
205 - Mood Indigo |
|
Blue Screens |
|
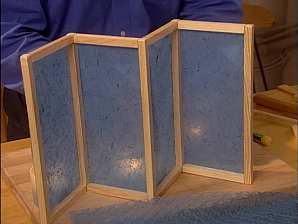
Our idea for a blue project crosses the paper lantern with the table
screen to create delicate paper frames that are beautiful as an
illuminated centrepiece or on a buffet or sideboard. This project
uses everyday tools, inexpensive materials and is so simple that
even your nieces and nephews may want to join in!
Tools
- small hammer
- 20 finishing nails
- small handsaw
- ruler
- exacto knife
- heavy wood cutting board
Materials
- glue stick
- 1/4 inch square moulding (at least 6 ft for every 2 piece
frame)
- sand paper
- beautiful paper for the screens
- small, votive candle with its container
Method
For the most basic stand-up frame with two sides, follow the directions
below. For an open-boxed lantern, double the materials and the procedure
and attach the units together in a square configuration.
- Measure 4 five inch pieces of wood and 4 twelve inch pieces
of wood.
- Using the small handsaw, cut wood into 4 pieces of the shorter
5 inch strips for the tops and bottoms.
- Cut wood into 4 pieces of 12 inch lengths for the upright
ends.
- Sand each end until smooth.
- Gently hammer finishing nails into either end of the twelve
inch piece without going all the way through.
- Place smaller pieces at either end and gently tap nails into
place, attaching the shorter ends to the upright length.
- Hammer finishing nails into either end of another 12 inch
length without going all the way through.
- Place it against the other part of the frame and tap it gently
into place with the hammer. You should now have a rectangular
frame unit.
- Repeat the entire procedure to make another frame unit.
- Attach the first and seconds units with finishing nails.
- Measure the paper against a single frame unit and add a 1/4
inch to the top and bottom edges, (or enough to attach the paper
to the frame).
- On the long pieces you may wish to leave some wood exposed
to give a Japanese lantern effect.
- Cut both pieces to size.
- To apply the paper to the wood, neatly run the glue along
the top and bottom faces of the frame unit.
- Place the paper on top of the glued area and gently smooth
it with your fingers to help the paper stick to the wood.
- Finish the top and bottom ends by applying the glue and folding
the paper neatly over one edge.
- Invert the frame and repeat on the other end.
- Repeat the entire procedure on the other frame unit.
To use, carefully place a votive candle which is safely enclosed
in its tall glass container behind the screen, making sure that
the open flame cannot come in contact with the beautiful paper frame
you have just made. Remember to never leave illuminated candles
unattended or in a windy place. |

|